中東猶長們的白色豪華坐駕Maybach 57s

By admin, September 28, 2010 10:29 pm

曾經在網上見過很多關於中東產油國紙醉金迷的圖片﹐還記得去年電影“色慾都市”中﹐迎接四位女主角的是阿布扎比酒店派來的四架Maybach頂級版的白色62s﹐一人一架﹐實在是太震撼了﹗

中東產油國大多數的富豪們都特別喜歡白色的豪華坐駕或者超跑﹐這可能與他們的服裝多數是白色有關﹐這點到是跟日本人不約而同。因為大和民族的超跑們都是以白色為主如GT-R﹑2000GT﹑NSX等﹐甚至連日本的法拉利Testarossa﹑F430等也清一色都是白色為主。

曾經在香港中區見過幾次Maybach 57/62的真身﹐尤其是“神棍”和“大劉”的那兩台﹐真車足足有6米長﹐氣勢的確非凡。

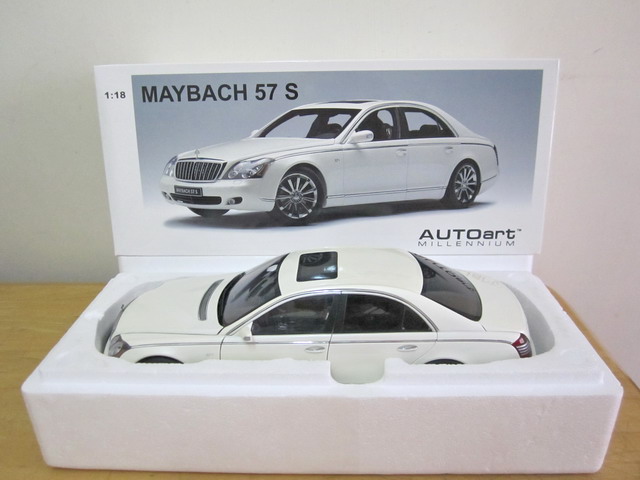
Autoart 白色的Maybach 57s這次真令人等得脖子都長了﹐足足超過兩個年頭﹐終于這個星期突然無聲無息靜悄悄地推出了。拿到後才發現白色並不是包裝盒上的那種純白色﹐而是金屬珍珠白﹐另外車窗也不是透明的﹐而是太陽濾鏡的那種透明黑色﹐這反而份外滲透著那份神秘的阿拉伯感覺。

1/18 Autoart Maybach 57s – White

IMG_2929

Import VM from previous VMware ESX versions into vSphere ESX 4.1

By admin, September 19, 2010 12:38 am

The following method proved to work even for pre-vSphere ESX servers (e.g., Dinosaurs like 2.5.4) vmdk files and same methodology also worked for True Image Server images.

Steps:
11. Use Veeam’s great free tool FastSCP to upload the original.vmdk file (nothing else, just that single vmdk file is enough, not even vmx or any other associated files) to /vmfs/san/import/original.vmdk. In case you didn’t know, Veeam FastSCP is way faster than the old WinSCP or accessing VMFS from VI Client.

2. Putty SSH into ESX host and change su -, then cd to directory /vmfs/san/import/, then  issue the command “vmkfstools -i original.vmdk www.abc.com.vmdk”

(note: Of course, you can use “-d thin” means thin provisioning, but I won’t recommend it as it’s waste of time and takes 2-3 times longer to convert to version 7, you will see why later)

I would also suggest DO NOT remove the original.vmdk until you have successfully completed the whole migration process.

3. Create a new VM as usual (for example, www.abc.com), when the wizard asked for disk size, just put 1GB (it’s going to be overwritten anyway later) . For best performance, select VMXNET3 during the configuration. (We shall add PVSCSI later, see step 5.)

Now, go back to putty, simply issue “mv www.abc.com* /vmfs/san/www.abc.com/”, it will ask you if you want to overwrite the two default files (www.abc.com.vmdk and www.abc.com-flat.vmdk), say yes to both.

4. Now right click and select Re-config (you must do this, or your VM won’t boot), Select everything and then change everything, including Windows License and Workgroup name, time, etc. Then you can boot this VM and login as usual.  Btw, you will find network is not ready as it’s DHCP, you can change to static IP later, after login, VM sysprep will do all the trick for you and it will also reboot itself and re-configure something more.

5. In order to have ESX 4 newly added PVSCSI for your disk controller, you will need to Add a new disk of say 10MB  and MUST choose a Virtual Device Node between SCSI (1:0) to SCSI (3:15) and specify whether you want to use Independent mode, then change the disk controller to PVSCSI, while keeping the original disk as whatever it is for now.

If you try to add PVSCSI to disk11 controllr without boot the VM, then you will get a famous blue screen BSOD as you haven’t installed or updated the VMware Tools for PVSCSI. Boot the VM, login and let VMTools to install all the necessary drivers for you including PVSCSI and VMXNET3.

Details see:
http://xtravirt.com/boot-from-paravirtualized-scsi-adapter
http://www.vladan.fr/changement-from-lsilogic-paralel-into-pvscsi/

Official from VMware (KB Article: 1010398)

Now shutdown your VM again, go to the original disk controller and change it to PVSCSI and power again. You’ve got it! Simple as that!

Of course, there is always some reason you DO NOT want to use VMware PVSCSI
http://blog.scottlowe.org/2009/07/05/another-reason-not-to-use-pvscsi-or-vmxnet3/

6. You may also want to re-configure the VM using re-configure now, what you need now is to right click the VM and choose “Re-Configure”, but before doing so, you will of course also need to install the corresponding sysprep in Virtual Center first.

For example, install Windows 2003 Sysprep files, you can download the file from

http://www.microsoft.com/downloads/details.aspx?FamilyID=93f20bb1-97aa-4356-8b43-9584b7e72556

Instructions: Run the filename.exe /x and extract the files into a folder, within you will find deploy.cab, extra again to C:\ProgramData\VMware\VMware vCenter Converter\sysprep\svr2003 (This is for ESX 4.1 VMware Converter). You will also need to do the same for C:\ProgramData\VMware\VMware vCenter\sysprep\svr2003 if you want to use sysprep for w2k3 template deployment later.

Use sysprep to edit the computer name, re-enter the Windows activation code and other stuff if necessary.

Now Power-On the VM, and login, it will automatically use sysprep to upgrade everything for you, just relax and watch the whole magical thing to happen, it will reboot the server, once it’s done, the only last step is to change the Display Hardware Acceleration to Full.

7. That’s it! Not yet! After reboot, when I tried to re-configure the IP again, I found

“The IP address you entered for this network adapter is already assigned to another adapter ‘VMware PCI Ethernet Adapter’. The reason is ‘VMware PCI Ethernet Adapter” is hidden from the Network connections folder because it is not physically in the computer.”

Solution:

-         Select Start > Run.

-         Enter cmd.exe and press Enter. This opens a command prompt. Do not close this command prompt window. In the steps below you will set an environment variable that will only exist in this command prompt window.

-         At the command prompt, run this command:
set devmgr_show_nonpresent_devices=1

-         In the same command prompt run this command:
Start devmgmt.msc (press Enter to start Device Manager.)

-         Select View > Show Hidden Devices.

-         Expand the Network Adapters tree (select the plus sign next to the Network adapters entry).

-         Right-click the dimmed network adapter, and then select Uninstall.

-         Close Device Manager.

-         Close the Command Prompt

Actually you would want to Uninstall all the previous NIC Cards just to make sure and have a clear environment.

8. To change back to Uniprocessor for VM

According to Microsoft, “If you run a multiprocessor HAL with only a single processor installed, the computer typically works as expected, and there is little or no affect on performance.” But if you’re like me and just want to be absolutely sure that there won’t be issues, switching back to the uniprocessor HAL in Windows Server 2003 is pretty easy:

-         Make sure you have at least Windows Server 2003 Service Pack 2 installed.

-         Shut down the virtual machine.

-         Change number of virtual processors to 1

-         Power on the virtual machine.

-         In Windows, go to Device Manager -> Computer.

-         Right-click “ACPI Multiprocessor PC” and choose “Update Driver…“.

-         Select “No, not this time” option -> “Install from a list or specific location” -> “Don’t search. I will choose the driver to install.” -> select “ACPI Uniprocessor PC.”

-         Reboot the virtual machine.

9. VMware ESX 4 Reclaiming Thin Provisioned disk Unused Space

http://www.virtualizationteam.com/virtualization-vmware/vsphere-virtualization-vmware/vmware-esx-4-reclaiming-thin-provisioned-disk-unused-space.html

The summary of the solution is to use sdelete & Storage Vmotion on the virtual machine to free up that unused space.

That’s all!!! You have just successfully imported or migrated a VM from a previous old ESX version to the latest ESX 4.1 and this method should work for all ESX versions, and what’s best, you upgraded all your existing VM to VMware Version 7 with PVSCSI and VMXNET3 enhanced drivers that you can really take the benefits with technology like vStorage/VAAI/Veeam Change Block Tracking (CBT), etc.

That’s all, for more info about Import or Convert VM into ESX, see

http://blog.lewan.com/2009/12/22/vmware-vsphere-using-vmware-converter-to-import-vms-or-vmdks-from-other-vmware-products/

10. To extend disk in real-time without downtime for Windows Server 2003/2000. (Windows 2008 has the magic build, you can expand/strink the partition on the fly)

a. You can use Diskpart to extend any non-bootable partition (e.g. , D:\) on the fly. *Need to disable Page file first!!!
b. You can use Dell’s Extpart to extend bootable partition (e.g., C:\) on the fly under ONE CONDITION, the extended partition need to be RIGHT-BEHIND C:\ partition. (You can use Acronis Disk Director’s Rescue Media to do this)


Update:

I found sometimes when importing an old VMDK file or Acrnois image, the default disk controller is IDE, which you definitely need to change it to SCSI for much better performance.

Converting a virtual IDE disk to a virtual SCSI disk (KB Article: 1016192)

To convert the IDE disk to SCSI:
1.Locate the datastore path where the virtual machine resides. For example:

/vmfs/volumes/

2.From the ESX Service Console, open edit the primary disk (.vmdk) in a text editor.
3.Look for the line:

ddb.adapterType = “ide”

4.To change the adapter type to LSI Logic change the line to:

ddb.adapterType = “lsilogic”

To change the adapter type to Bus Logic change the line to:

ddb.adapterType = “buslogic”

5.Save the file.
6.From VMware Infrastructure or vSphere Client
a.Click Edit Settings for the virtual machine.
b.Select the IDE virtual disk.
c.Choose to Remove the Disk from the virtual machine.
d.Click OK.

Caution: Make sure that you do not choose Remove from disk.

7.From the Edit Settings menu for this virtual machine:
1.Click Add > Hard Disk > Use Existing Virtual Disk.
2.Navigate to the location of the disk and select to add it into the virtual machine.
3.Choose the same controller as in Step 3 as the adapter type. The SCSI ID should read SCSI 0:0.

8.If a CDROM device exists in the virtual machine it may need to have the IDE channel adjusted from IDE 0:1 to IDE 0:0. If this option is greyed out, remove the CDROM from the virtual machine and add it back. This sets it to IDE 0:0.
PCCW 100Mbps Fiber Broadband

By admin, September 18, 2010 3:32 pm

Today PCCW come to my place to install PCCW 100Mbps FTTH Fiber Optics for FREE! :)

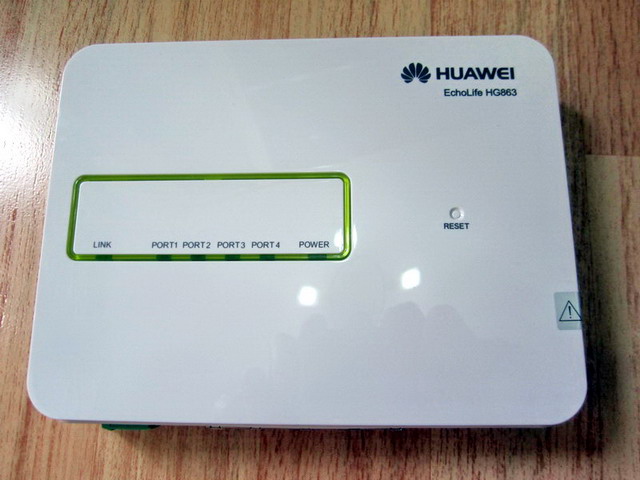
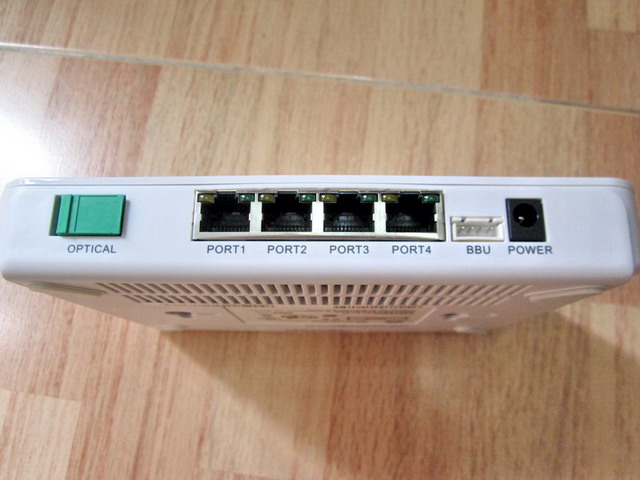
It did take the whole team of 4 staff 3 hours to finish the testing and QC, now I have two 100Mbps broadband at home, one is PCCW (Fiber), the other is HKBN (RJ-45) and both can reach upload/download at 100Mbps. During the setup, PCCW staff used WebUI login to HuaWei HG863 and I asked if there is any special tunning I can do to increase performance or add feature, the answer is Not Much.

Shortly after, I am going to use Netscreen 5GT dual-home feature to combined the two for load-balancing and failover.

IMG_2765

IMG_2766

IMG_2764


根據跨國業界組織「光纖到戶協會」(Fiber-to-the-Home Council)於二○一○年二月發表的資料顯示,本港光纖到戶及光纖到樓服務的住戶滲透率(即使用兩類服務的住戶佔住戶總數的比例)為百分之三十三,全球排行第三,僅次於南韓和日本。部分亞洲其他地區有關的住戶滲透率如下:

    地區   光纖到戶及光纖到樓的住戶滲透率
    ──   ───────────────
    南韓     百分之五十二
    日本     百分之三十四
    台灣     百分之二十四

Equallogic takes time to kick in the additional paths under Windows MPIO

By admin, September 17, 2010 4:02 pm

I’ve spent almost 4 hours on-phone from mid-night to 4am in the morning trouble shooting with Dell Equallogic Consultants in US via WebEx today.

eqlpsAs we found the EQL I/O testing performance is low, only 1 path activated under 2 paths MPIO and disk latency is particular high during write for the newly configured array.
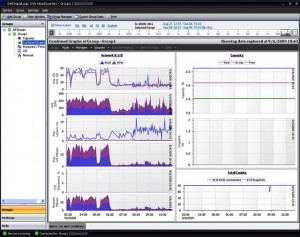
It was finally solved because we forgot the most fundamental concept after all that is Equallogic takes time to kick in the additional paths under MPIO!!! You need to wait say at least 5 mins to see the rest paths kick in.

The followings are my findings and mostly email exchange with Equallogic support. yes, it is long and boring to many, but it’s extremely useful for some who are seeking the same solutions for this problem, I wish someone put it on their blog previously, then I could sleep much better last night.

Timeline as in Descending Order:

- 2pm

We found a very interesting fact that the 2ND LINK WILL ONLY KICK IN AFTER THE 1ST LINK BEING SATURATED/OVERLOADED for a period of time, see 1.gif and 2.gif, So MPIO with Dell EqualLogic DSM (not using Microsoft Generic DSM) is actually working perfectly now and before!

1.gif showing both links are activated, I saw the 2nd link (EQL Mgt 2) suddenly kicked in (may be we opened more copy windows to iSCSI target) and it dropped out again and then come back again when needed.

2.gif shows the performance of the two active ports on EQL Iscsi target also increased by a lot. (From 45% to 80%)

So I can pretty sure the issue doesn’t exist right from the beginning, it just TAKES TIME FOR THE REST NICs (LINKs) to be activated gradually over the testing period and according to loading situation automatically. Previously, we only tested for less than 2 mins, in other words, we didn’t give enough time for MPIO intelligent logic to kick in additional paths for throughput or I/O.

- 12pm

See attached TR1036-MPIO_EQLX-DSM.pdf PS Series Best Practices
Configuring and Deploying the Dell EqualLogic™ Multipath I/O Device Specific Module (DSM) in a PS Series

MPIO DSM Load-Balance Policy

Microsoft MPIO DSM allows the initiator (server) to login multiple sessions to the same target (storage), and then aggregate that into a single device. Multiple target sessions can be established using different NICs to the target ports.

If one of the sessions fails, then another session continues to process I/O without interrupting the application.

Dell EqualLogic MPIO DSM supports following balancing policies.

• Fail Over Only: Data is sent in one path, while other paths are standby. This connection is used for routing data until it fails or times out. If the active connection fails, then one of the available paths is chosen until the former is available. This load balancing policy is the default configuration when MPIO DSM is disabled.

• Round Robin: All available paths are used to perform I/O in a rotating sequence (round robin sequence). There is no disruption in sending I/O even if any of the paths fails. Using this policy, all paths are used effectively.

• Least Queue Depth: I/O is sent to the path that has least queue length. The performance analyses for the above load balancing policies are presented in the following sections.

• EQL recommend to use Microsoft DSM with “Least Queue Depth” load balancing policy on Windows Server 2003/2003

• To fully utilize Microsoft’s MPIO capabilities, Dell EqualLogic provides MPIO DSM that is complementary to ASM for both high availability and performance.

- 11am

I found something very important on google.

Device Initialization Recall that MPIO allows for devices from different storage vendors to coexist, and be connected to the same Windows Server 2008 based or Windows Server 2003 based system. This means a single Windows server may have multiple DSM’s installed. When a new eligible device is detected via PnP, MPIO attempts to determine which DSM is appropriate to handle this particular device.

MPIO contacts each DSM, one device at a time. The first DSM to claim ownership of the device is associated with that device and the remaining DSMs are not allowed a chance to press claims for that already claimed device. There is no particular order in which the DSMs are contacted, one at a time. The only guarantee is that the Microsoft generic DSM is always contacted last. If the DSM does support the device, it then indicates whether the device is a new installation, or the same device previously installed but which is now visible through a new path.

Does this means if we see multiple DSM in MPIO, DELL Equallogic will be always used first or it’s priority is always higher than MS DSM?

- 10am

Some update I found: Even I added back with mpclaim -r -i -d “MSFT2005iSCSIBusType_0×9″

MPIO is still showing Dell Equallogic is the DSM instead of Microsoft, how can I force MPIO to select Microsoft instead of Dell Equallogic as desired? That exactly explained why there is ONLY ONE PATH (or NIC) working at the same time, but not load balancing across two NICs.

I even did a real time test, by Disabling a NIC, then all traffic automatically shifted to the 2nd NIC (or path) and vice versa. So seemed Windows Server 2008 R2 doesn’t understand Dell Equallogic DSM for MPIO. In other words, if Dell Equallogic is the DSM, then only one path is available.

I also find out from Google, that Windows Server 2008 DOES NOT add “MSFT2005iSCSIBusType_0×9″ automatically like in Windows Server 2003, we need to add it manually from MPIO GUI or CLI.

See the output.

C:\Users\Administrator>mpclaim -s -d

For more information about a particular disk, use ‘mpclaim -s -d #’ where # is
he MPIO disk number.

MPIO Disk System Disk LB Policy DSM Name
——————————————————————————-
MPIO Disk0 Disk 2 RR Dell EqualLogic DSM

C:\Users\Administrator>mpclaim -s -d 0

MPIO Disk0: 02 Paths, Round Robin, ALUA Not Supported
Controlling DSM: Dell EqualLogic DSM
SN: 6090A078C06B1219D3C8D49CF188CD5B
Supported Load Balance Policies: FOO RR LQD

Path ID State SCSI Address Weight
—————————————————————————
0000000077070001 Active/Optimized 007|000|001|000 0
0000000077070000 Active/Optimized 007|000|000|000 0

C:\Users\Administrator>mpclaim -r -i -d “MSFT2005iSCSIBusType_0×9″

So the KEY question is how can we FORCE MPIO DSM TO USE Microsoft instead of Dell Equallogic?

- 9am

1. Removed MPIO from W2K8 Feature, reboot, then remove HIT, reboot, and re-installed again, reboot, under MPIO, still no MSFT2005iSCSIBusType_0×9.

2. This time, I changed the NIC’s Flow Control to TX & RX and reading performance of EQL also increased to 99%.

I do think we need to enable Flow Control RX as well, as we saw yesterday, only writing to EQL is working at 99%, but reading from EQL is at 20%, so this proved it’s required.

3. Also, disk latency for read is very small (39ms compares to 350ms for write) when we saturated the link using multiple 16GB files, however, writing to EQL and overloading the link still gives us over 300ms disk latency. Those high number of Re-transmit % all went down from 5-6% to 1-2%.

4. No more MPIO initiator dropping out problem even without MSFT2005iSCSIBusType_0×9 in place, it may not be necessary after all?
As I installed HIT twice, MSFT2005iSCSIBusType_0×9 is not there as always, I suspect manually adding it can actually cause more problem? Or shall I remove MPIO from W2K8 Feature and just install it again manually to see if MSFT2005iSCSIBusType_0×9 pops up?

Extra Notes:

MPIO CLI Comands

mpclaim -r -i -d “MSFT2005iSCSIBusType_0×9″
(Note: HIT installation on Windows Server 2008 R2 DID NOT add this to MPIO)

mpclaim -s -d

mpclaim -s -d device_name

mpclaim.exe –v C:\Config.txt

C:\Users\Administrator>mpclaim -s -d

For more information about a particular disk, use ‘mpclaim -s -d #’ where # is
he MPIO disk number.

MPIO Disk System Disk LB Policy DSM Name
——————————————————————————-
MPIO Disk0 Disk 2 RR Dell EqualLogic DSM

C:\Users\Administrator>mpclaim -s -d 0

MPIO Disk0: 02 Paths, Round Robin, ALUA Not Supported
Controlling DSM: Dell EqualLogic DSM
SN: 6090A078C06B1219D3C8D49CF188CD5B
Supported Load Balance Policies: FOO RR LQD

Path ID State SCSI Address Weight
—————————————————————————
0000000077070001 Active/Optimized 007|000|001|000 0
0000000077070000 Active/Optimized 007|000|000|000 0

C:\Users\Administrator>mpclaim -r -i -d “MSFT2005iSCSIBusType_0×9″

Equallogic and ESX 4.1 iSCSI Setup Crack Sheet

By admin, September 16, 2010 7:17 pm

sanhqFor the whole month, my mind is full of VMWare, ESX 4.1, Equallogic, MPIO, SANHQ, iSCSI, VMKernel, Broadcom BACS, Jumbo Frame, IOPS, LAG, VLAN, TOE, RSS, LSO, Thin Provisioning, Veeam, Vizioncore, Windows Server 2008 R2, etc.

It’s definitely like taking an extremely fast track in getting my enterprise storage degree, and after all, it worths every penny of struggling, many long nights, endless calling to Pro-Support in Hong Kong and US EQL supports.


Equallogic and ESX 4.1 iSCSI Setup Crack Sheet to save you typing many commands.

  1. Configure iSCSI vSwitch using GUI first and assigned multiple NICs onto the vSwitch, in my case, it’s 4 NICs.
  2. Create multiple VMKernel on this vSwitch, in my case, there are 4 VMKernel (named iSCSI 1 to iSCSI 4)
  3. Removed the extra NICs from individual VMKernel by unselecting 3 of those NICs and do this for each VMKernel.
  4. # Enable Jumbo Frame on iSCSI vSwitch using CLI
    esxcfg-vswitch -m 9000 vSwitch4
    esxcfg-vswitch -l to verify MTU=9000
  5. # Enable Jumbo Frame on each VMKernel using CLI
    esxcfg-vmknic -m 9000 iSCSI1 – iSCSI4
    esxcfg-vmknic -l to verify MTU=9000* I also enabled Jumbo Frame for VMotion as well as FT network.
  6. Go to GUI, enable software iSCSI and note down the vmhba #, in my case, it’s vmhba47.
  7. # Bind VMKernel to iSCSI Adpater using CLI
    esxcli swiscsi nic add -n vmk2 -d vmhba47
    esxcli swiscsi nic list -d vmhba47 to verify if all 4 NICs are binded with vmhba47
  8. Do a rescan of the Storage, you will see EQL volume now. Please make sure you checked “Allow Simultaneous Connection…” under EQL volume property, or multiple ESX connection to the same volume won’t work.
  9. To verify from EQL, go to group manager, then click that volume, now you see there are 8 connections with 8 different IP Addresses (ie, 2 ESX hosts, with 4 NICs each)
  10. To verify from ESX host side, go to storage, right click Manage Path, you will see there are 4 IP Addresses from EQL.


Just got a reply from Equallogic support team regarding my customized configuration.

The document on the web site is the supported method of setting Jumbo Frames on the switch. This is the method that we have tested and confirmed to work.

Of course, as with many things, there is typically a method of doing this through the GUI as well. The method you are following appears to work in my tests as well, but we cannot confirm if it is a viable operation as it has not been tested through our QA process.

My suggestion would be to utilize the tested method. You may also want to check with VMware directly as it is possible that the GUI method you are utilizing simply calls the CLI commands we provide, but we cannot confirm that for certain (we do not have access to their code).

(Name Removed)

Enterprise Technical Support Consultant
Dell EqualLogic, Inc.


Finally, test ping your destination with a large message and specify don’t fragment.

  • Linux VMs:         ping –M do –s 8000 <ip address or destination>
  • Windows VMs:    ping –f –l 8000 <ip address or destination>
  • ESX(i):                vmkping –d –s 8000 <ip address or destination>

當收藏變成了Mission Impossible

By admin, September 14, 2010 10:23 pm

對于近期Autoart/BBR/Kyosho/Minichamps等各大車模廠一窩風的把能夠變化的版本都用子彈的速度出了個夠﹐不同的顏色﹑不同的小改動加起來就產生了無窮無儘的變化版本﹐看來他們誓要把模具用到爛為止以賺取最大的經濟利益才罷手。

這導致了一個很嚴重的後果﹐就是令很多車模愛好者逐漸地產生了疲倦感﹐也就是根本不可能把全部的變種版本都收個遍﹐那只能挑自己最喜歡的來收了。簡單的來說﹐這批車模愛好者相對地比以前買少了很多。

近年那些LP560-4, LP550-2, Gallardo﹐變種一大堆少說都有25款﹐就拿最近大眾期待的Gallardo LP550-2來說﹐已經上市的就已經5個顏色了﹐還沒算之後會出的那些變種﹐而且價錢是每半年就提高一兩成﹐看來不用多久就會耗盡市場的購買力﹐損人不利己。

合理加價的空間當然是有的﹐但有時只需薄利多銷就可化解成本的上昇﹐但如果目光短淺的話﹐就很可能失去一大批資深的車模收藏家﹐影響深遠肯定會連累下游的經銷商們。車模收藏是一門經得起時間考驗的嗜好﹐所以各大車模廠們應該放長眼光才能保證穩定的收入﹐而不是趁機撈一筆快錢﹐就如殺雞取卵般魯莽行事﹐試想如果沒了這批眾多的資深車模收藏家們(這批可是每個月固定的消費者)﹐其它都是空談﹗

1/18 Autoart Lamborghini Gallardo LP550-2 – Valentino Balboni Edition Green

IMG_2876

我的第一輛BMW:寶藍色廠盒版的750Li F02

By admin, September 14, 2010 10:01 pm

不知道為什麼﹐自己一直對寶馬不怎麼感冒﹐可能自己對超跑更加有興趣。

唯獨記得小時候看澳門東望洋房車大賽的時候﹐最引人注目的是那兩台紅白藍拉花的M3(E30﹖)﹐當時感覺它們的外形實在與眾不同﹐而且性能十分驚人﹐記得看比賽的時候曾經“哇”了好多次﹐而且之後經常跑去環球模型觀摩高手製作的M3模型﹐它的確令當時的我著迷了一整個學期。

多年過去了﹐BMW也改朝換代好多回了﹐但自己仍然對BMW沒什麼興趣。說實在的﹐德系豪華房車市場的兩大巨頭奔馳和寶馬﹐寶馬多年來一直都是“二奶”的命運﹐就像女士們喜愛的LV和Gucci一樣。無論車型和技術寶馬一直都給奔馳牽著鼻子走﹐但近年的奔馳和寶馬好像都沒什麼看頭了﹐尤其是奔馳﹐幾代的S系列大同小異﹐悶得要命﹐它倆似乎都太沉醉在自己壟斷市場的美夢裡而忽略了德系後起之秀Audi的再次撅起。

話歸原題﹐原來是想去看看大邁的白色57s出了沒有﹐但在車模舖子看到一BMW的廠盒包裝﹐好奇心驅使下請老闆打開給我看看。不看還好﹐一看到那高貴的寶藍色﹐我就知道這次肯定又跑不掉了。另外加上前晚逛MC論壇的時候(所以還是少看為妙﹐說笑)﹐看了太多有關750Li F02的帖子﹐自然而然就對750Li F02特別產生了好感﹐再加上廠版的原因﹐馬上腺上激素增高了不少﹐應該說是買車的衝動才對﹐當然老闆的特別優惠和爽快也是令人感到購買服務滿意的因素之一。

事實上我認為世上沒有誰比BMW更加適合用這高貴的寶藍色﹐君不見這特有的寶藍色似乎已經成為BMW頂級豪華行政房車系列的Signature﹐我就沒怎麼見過奔馳S系列用寶藍色的﹐因為大奔的Signature色是黑色。

很多人認為新一代的寶馬很難看﹐我自己並不這麼認為﹐一來一直對寶馬不感冒﹐二來大鼻孔的750Li F02相對小鼻孔的745Li/760Li等來的更時尚﹐當然小鼻孔的寶馬給人的感覺是另一種清秀的儒雅﹐各有各的好處。另外自己還是對屁股好看的車特別感興趣﹐750Li F02就是一例﹐給人與一種成熟又穩重生意人的感覺﹐LEXUS的LS460似乎就是看中了寶馬的這個屁股﹐要不然LS460的尾巴怎麼這麼像750Li F02﹖

最後這次京商做的真很細緻﹐連車頭細緻的LED燈都做出來了﹐值得大家收藏。

1/18 Kyosho BMW 750Li F02 Dealer Version – Blue

IMG_2877

意外收穫: Bentley Continental Flying Spur

By admin, September 14, 2010 10:00 pm

今天去了旺角車模店一個月一次的開倉活動﹐情形就如同尋寶一樣在車模堆中瘋狂地尋找自己的獵物﹐意外地在一個陰暗的角落裡發現了它。

這是台有很久歷史的Bentley Continental Flying Spur﹐沒記錯的話應該是Minichamps的第一版Continental Flying Spur(指得是內飾顏色)。

我幾乎所有1比18賓利款式都有收藏包括那些極為罕見的Dealer Version(綠色廠盒版本)﹐但唯獨沒收藏任何一款的Bentley Continental Flying Spur。因為在馬路上見過很多次真車﹐覺得1/18版本的Continental Flying Spur車形做的不太準﹐沒了真車的那種動人的神態。這次覺得這個1比43的小傢伙車形還原得還不錯﹐加上好看的內飾顏色﹐它自然而然就成為了我的囊中之物。


1/43 Minichamps Bentley Continental Flying Spur

IMG_2873

50年後的奔馳鷗翼SLS AMG

By admin, September 5, 2010 10:50 pm

今天偶然在尖沙嘴海港城BENZ新車展覽上看到了傳說中的它﹐說實在的﹐這個孫子輩跟50年前的父輩300SL在設計上來說根本就是沒的比﹐我上下左右﹑兜圈子怎麼看都覺得SLS沒性格﹐還不如SL65來的有氣勢。

它特長的車頭跟特短的車尾視覺上根本就不協調﹐這樣的德國超跑設計在我個人看來完全是敗筆之作﹐有這錢還不如買架賓利或者是阿斯頓馬丁。

這也是我為什么一台SLS的車模都沒收的主要原因﹕它跟我的審美觀點太過南轅北轍了。